DynaVap Maintenance: How to clean and maintain your DynaVap vaporizer
|
Time to read 9 min

|
Time to read 9 min
Jump to:
If you’re here, it means you’re probably a part of our wonderful DynaVap community a.k.a the DynaFamily. Whether you have the M Plus, Omni or any other Dynavap, we chose this device for its unparalleled traits that allow us to enjoy a neat experience with our beloved flora without the need for electricity or batteries.
As if this was not enough, DynaVap’s sleek design makes it easier for us to carry out the one task we need to complete as owners to ensure its maximum potential is being reached: vape maintenance.
When you let enough time go by without cleaning your DynaVap, your taste buds may start noticing its performance getting affected. This is bound to happen sooner or later as a result of both usage and simply the passing of time.
A clean vaporizer, together with its proper use, will give you the highest quality vapor and the best possible taste out of any product you put in it, so it’s important to maintain your devices regularly to allow a smooth experience.
After all, that’s why you chose a DynaVap, right?
So, to start off this year the right way, we’ve put together the ultimate guide to cleaning and maintaining all your DynaVap accessories and devices (with some pro user tips and alternatives for you to try out).
Read on and get started!
Keeping your device and accessories consistently well-maintained will ensure they have a longer lifespan, but the frequency with which you do so will mainly be defined by you, although we suggest a full cleanse at least once a month.
One of the main advantages of vaping instead of smoking is that it’s overall healthier for you, but this won’t necessarily continue to be the case if you’re keeping it stored without any care, as just like anything else, it’s prone to develop mould or bacteria if there’s any kind of residue building up inside of it.
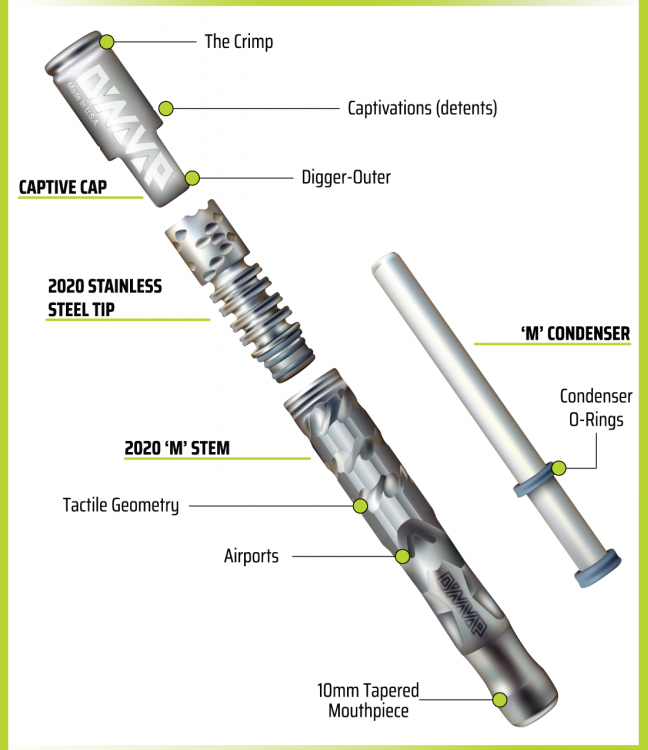
DynaVap makes cleaning their products incredibly simple, as you don’t need any special tools to disassemble your VapCap and this will speed up the whole process. What's great is that the basic build is similar across all the Dynavap series; DynaVap M Vaporizers, Omni or Vong series.
Taking apart your DynaVap is always the first step in all devices and accessories, and should leave you with four groupings: body stem, condenser, tip and cap. When doing so, you will need to remove the O-ring from the condenser only (warning: do not remove the tip’s O-rings as they are meant to stay in place always) and place it with the cap for cleaning.
Not all parts of your DynaVap requires the same frequency of cleaning, and there is one special piece that will demand more attention: the tip.
Your tip is where the chamber is located, and it is in constant contact with the dry herbs that you’re pressing inside of it and should ideally go through a quick cleanse after every vaping session, but as a bare minimum this should be done once a week.
In addition, another main advantage of vaping vs. smoking is its non-combustion quality that allows for the purest taste, no matter the product you put in. So, should you choose to use different strains during the same session, it would be highly advisable to clean the tip during each switch to make sure you’re getting the most out of the whole experience.
This quick cleanse should take a couple of minutes only, and it consists of a simple three-step routine:
Step 1 : Empty the chamber of your DynaVap, softly blowing in it to push out any leftover material.
Step 2 : Moisturize a cotton bud or swab by running some water on it and gently wipe the inside of your tip.
Step 3 : Use the other end of the cotton bud and repeat the wipe in order to dry your equipment immediately for assembling it back.
Done!
You may also be a concentrates lover, in which case you’re already using the DynaCoil, and you know exactly what I’m going to say next: oils, liquids, full melt concentrates, you name it- this good stuff will get stuck if you don’t do anything to prevent it from the very beginning.
If you’re using a DynaCoil, or switching back and forth from concentrates to dry herb, you should make sure to clean it every time to avoid build up and damage.
The first thing you need to remember is that DynaVap, such as other vaporizers out there, has been meticulously designed with a combination of the highest quality materials to ensure the best results, which means not all the parts you have to clean will go through the same process.
The three materials you will encounter are metal, glass and wood and the second step after disassembling your device will always be separating the parts by material.
Chief Baker recommends these items below for optimum DynaVap cleaning to maintain the flavour produce and device longevity. And now is the best time to stock up on your vape care kits!
You may first be tempted to use alcohol to clean your metals but be warned: DynaVap advises that you should soak them in any flammable liquids, as you could risk catching fire when heating up your device (oops!).
We think isopropyl alcohol usage for gunkier cleaning is still OK, as long as you ensure that the device is left to dry for long period and is completely dry.
Tools for cleaning your DynaVap aromatherapy vaporizer :
- A leak proof container (it can be a jar or bag).
- Kitchen soap and water solution.
- Cotton swabs/buds.
- Paper towels.
DynaVap takes pride in using only the best quality materials out there, so some of their pieces have been designed in medical grade stainless steel and others in Grade 2 titanium, making them pretty easy to clean too.
Here's how you clean the metal parts on your DynaVap:
If you haven’t cleaned the cap and tip properly in a week or more, keep them soaking overnight instead for all the possible build up to loosen up.
In fact, they also benefit tremendously from an insider trick: every two weeks, instead of just soaking them in soapy water, add some vinegar and salt with warm soapy water for a power cleanup.
Lastly, scorch marks...many ask us about this! There are a couple of ways to remove the scorch marks and soot from the DynaVap stainless steel cap. Wash the cap with warm water and apply any of the following suggestions: metal polish, steel wool or a baking soda and vinegar mix.
Scorch marks are part of the normal use patina, but to prevent soot buildup when using a soft flame lighter, keep the cap deep in the blue part of flame and try to minimize the amount of yellow flame. This will avoid the soot causing yellow part of the flame contacting the cap, as well as provide a more even heat distribution around the cap.
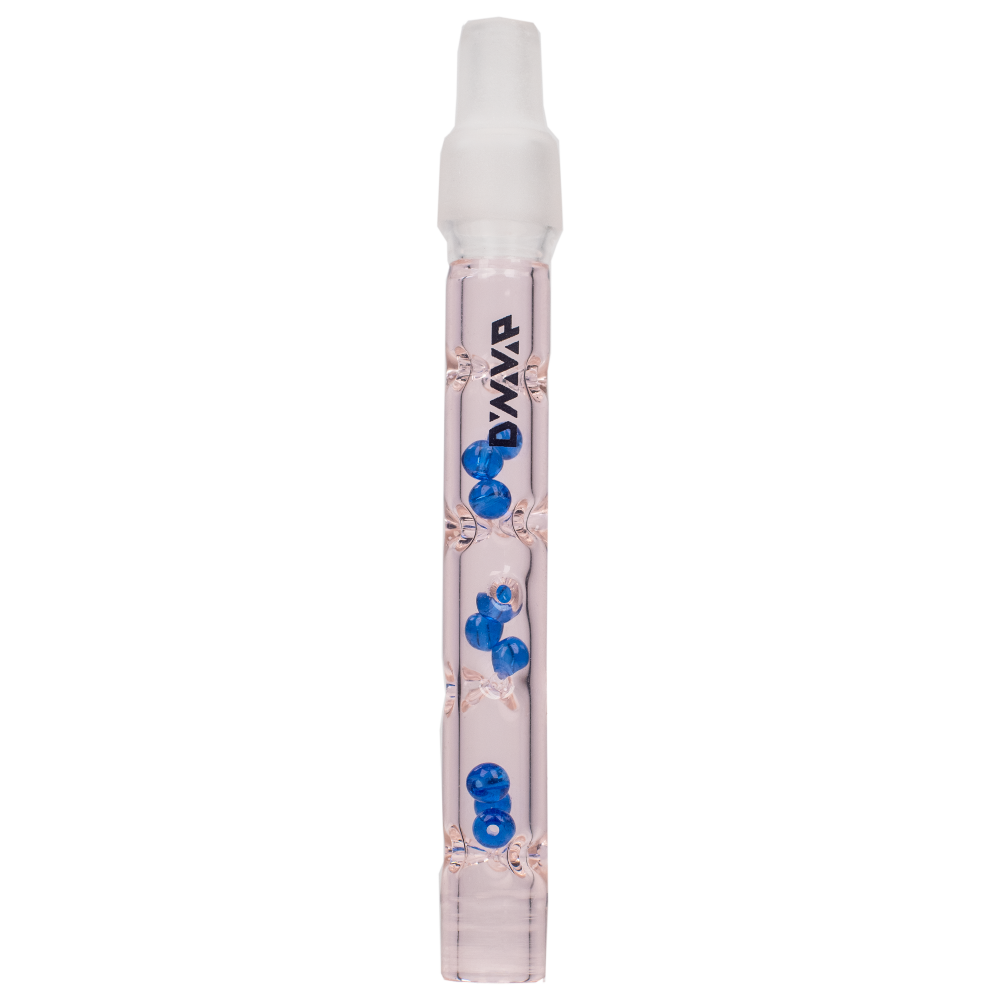
If you own a BB9, Galaxy, Turbo Twist, or any glass accessory manufactured by DynaVap, chances are you’ve picked that specific design for a reason: they are not only highly functional, but also elegant and beautiful, that’s why it’s important to keep that glass shiny and clean!
To keep things ship-shape, you will need:
Steps to clean your DynaVap glass parts :
The Vong and the HydraVong are the two wooden devices designed by DynaVap that will require maintenance.
Although they don’t necessarily require cleaning (that is, if not stained accidentally by an external source), they do need regular maintaining to keep the wood hydrated.
This will hold their look and feel in perfect condition, and it only requires a simple process with the use of only one other item: DynaWax.
For more information on assembling the HydraVong, visit this video on DynaVap’s YouTube channel, which was created to help us users out!
Last but not least, let’s go over some tricks you may want to try out to make sure your devices are in the best shape ever and enhance your whole experience.
DYNAVAP DON'Ts
DYNAVAP DOs
Now go put all this into practice! Remember that the more you keep up these best practices, the higher you will elevate your whole experience and the more you will get out of your DynaVap AND materials.
Stay in touch with your fellow DynaVapers, check out this Reddit thread where you can share your own experience and read up on their comments too.
Image credit: Dynavap.com
Reach out to Pocket Ovens using the chat function or email us for any assistance, we are ever ready to help. If you found this helpful or want our articles fresh out the oven 😉, sign up to our mailing list below!